




Installing a garden fence is one of the most satisfying DIY home improvement projects you can complete.
A sturdy boundary fence boosts home security, adds privacy, and instantly freshens up your outdoor space.
Whether you are replacing fence panels on an existing run or building a brand-new boundary from scratch, this guide breaks down how to install fence panels, timber gravel boards, and timber posts step-by-step.
Estimated reading time: 3 minutes
Tools you’ll need for a fencing project (as well as two pairs of hands)
- spade
- post digger
- spirit level
- cordless drill
- pressure treated timber gravel boards
- galvanised screws or nails
- hammer
- tape measure
- trowel
- bucket
- length of twine
- pencil or marker
- timber battens
- postmix
- pressure treated timber fence posts
Planning and Site Preparation
- Check Boundaries: Confirm legal property lines and discuss plans with neighbours if sharing a boundary line.
- Clear the Line: Remove weeds, old fencing, roots, and rocks along the installation route.
- Check Utilities: Verify there are no buried water pipes or electrical cables before digging.
- Set Your Line: Drive a peg at each end of the run and pull a string line tightly between them as a straight visual guide.
Before digging, work out your exact post dimensions using these two simple formulas:
How to Work Out Fence Post Depth:
Fence panel height in feet divided by 3
For a 6ft panel, six divided by three means 2ft of the post must be buried underground to handle high winds when learning how to install fence posts.
How to Work Out Fence Post Height:
(Fence panel height in feet divided by 3) + Fence panel height
For a standard 6ft panel, six divided by three is two, plus six equals an 8ft post.
Step 1: Dig the First Post Hole
- Dig your first hole at the start of the string line, 600mm deep and three times as wide as your timber posts.
- Optional: Pour a 3-6 inch layer of gravel into the bottom of the hole for proper drainage and help level the post before adding concrete.

Step 2: Set the First Post
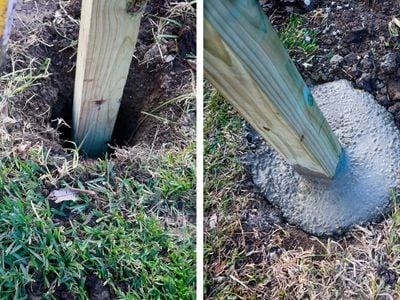
- Position the post in the hole center. If using concrete posts, ensure the slotted side faces down the fence line.
- Check vertical level on two adjacent sides using a spirit level.
- Add water, pour in fast-setting post mix up to 50mm below ground level, and hold the post plumb while it sets firm.
- Slope the wet concrete surface away from the post base so rainwater drains freely.
Top tip: Prop up your post while it sets with lengths of timber battens.
Step 3: Install the Timber Gravel Board
A pressure treated timber gravel board sits at ground level, protecting the bottom of the panel from damp soil, rot, and garden machinery.
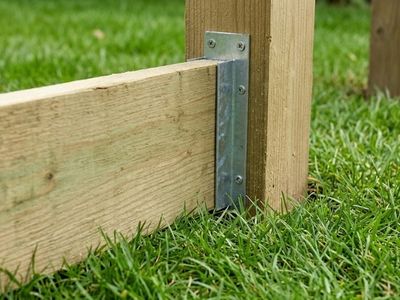
- Screw galvanised brackets to the inner face of the first post at ground level.
- Level the ground beneath, slot the board into the brackets, and secure with galvanised screws.
- Treat any saw-cut edges immediately with a brush-on wood preservative, as cutting breaks the protective envelope of pressure treated wood.
Step 4: Install the First Fence Panel
Build your fence one bay at a time to keep measurements accurate across uneven ground.
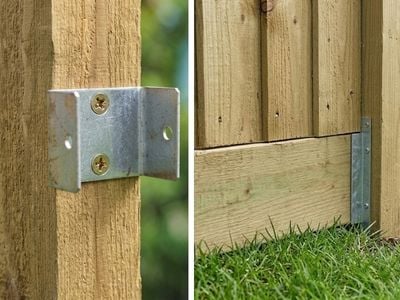
- Fix panel clips to the first post, then rest the bottom of the panel directly onto the gravel board.
- Screw the panel securely to the clips.
- If using concrete posts, slide the gravel board and panel down the pre-formed post slots. Tap a thin piece of timber into the channel alongside the frame to prevent panels rattling in high winds.
Step 5: Dig the Next Hole and Repeat
- Measure out the exact panel width to dig the next hole for your second post.
- Repeat the steps as before; position the second post, fill in with postmix, attach the panel and gravel board, and check levels carefully.
- Ensure the post is plumb, the panel top is flat, and the post face aligns with your string line before pouring concrete.
- Repeat this process bay-by-bay.
Do I Set All The Fence Posts At Once, Or One By One?
Choosing how to install your fence comes down to personal preference, but if you are a beginner or working with a helper, we recommend building bay-by-bay to ensure your panels fit perfectly without stress.
Setting Posts One-by-One (Bay-by-Bay)
Setting All Fence Posts First
This approach involves setting your first post, attaching the gravel board and panel, and then setting the next post to lock that bay into place before moving down the line.
Pros:
Higher Accuracy: Eliminates human measuring errors because each post is positioned against the actual physical panel and gravel board.
Less Stress: For DIYers working alone, you only manage one section at a time without worrying about rapid-setting concrete hardening before panels are slotted in.
Ideal for Irregular Terrain: Makes adjusting for slopes or custom panel cuts significantly easier.
This method involves measuring, digging, and concreting every single post along your string line before attaching any timber panels or gravel boards.
Pros:
Faster Batch Working: You can dig all holes, pour concrete, and set all timber posts or concrete posts in one continuous session.
Easier Clean Up: All messy earth digging and concrete mixing is completed in one go.
Cons:
Slower Progress: You have to pause and wait for the concrete to set around each post before moving on to dig the next hole and attach the next bay.
Cons:
Zero Margin for Error: A measurement off by just 5mm or a post setting slightly out of plumb can prevent your panels from fitting into the gap.
Tricky Fixes: If a gap ends up too narrow or too wide once the concrete has cured, fixing it requires digging out hard concrete or trimming every panel down to fit.
Looking for timber fence panels, posts, or gravel boards?
We’ve got you covered!
Whether you’re starting a new installation or replacing a worn-out panel, we have everything you need to build a sturdy, professional-looking fence.